The Freestyle Lite meter, detailed in a 72-page instruction manual, is a glucose monitoring system. It’s highly rated, averaging 8.8 from 24 users, offering convenient blood glucose testing.
What is the Freestyle Lite Meter?
The Freestyle Lite meter is a compact and user-friendly blood glucose monitoring system designed for individuals managing diabetes. As detailed in its comprehensive 72-page instruction manual, this device provides accurate and reliable blood glucose readings. It’s a popular choice, evidenced by an average rating of 8.8 from 24 users who have utilized and reviewed the product.
The meter facilitates effective diabetes management through simple operation and clear result displays. It’s a crucial tool for self-monitoring, empowering users to make informed decisions about their health and treatment plans, as outlined within the provided documentation.
Key Features and Benefits
The Freestyle Lite meter boasts several key features, as thoroughly explained in its 72-page instruction manual. These include its compact design for portability and ease of use. The meter’s high rating – an 8.8 average from 24 users – reflects its reliability and accuracy.
Benefits extend to simplified self-monitoring, enabling informed diabetes management. While specific features like data downloading aren’t explicitly mentioned in the provided snippets, the manual likely details these functionalities. It empowers users with control over their health, promoting proactive care and well-being.
Understanding the Meter Components
The 72-page Freestyle Lite instruction manual details all parts – display, buttons, and test strip port – essential for accurate glucose monitoring and proper operation.
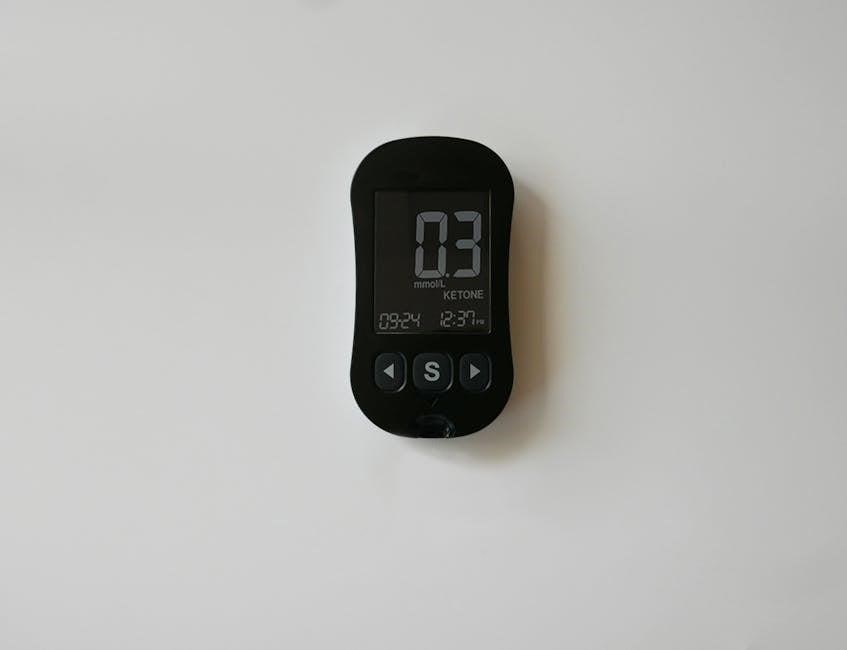
Meter Display Overview
According to the Freestyle Lite instruction manual, the meter’s display is designed for clear and easy-to-understand readings. It prominently shows your blood glucose result in large numerals, ensuring quick interpretation.
Additional information displayed includes the date and time, crucial for tracking trends. Symbols indicate meter status, such as low battery or error messages. The manual explains each symbol thoroughly.
Furthermore, the display shows test strip quality and any control solution results, aiding in maintaining accuracy. Understanding these display elements, as outlined in the manual, is vital for effective self-monitoring.
Button Functions
The Freestyle Lite instruction manual details the functions of each button for seamless operation. The power button turns the meter on and off, initiating or ending testing sessions; The ‘Start’ button applies the blood sample to the test strip, initiating the glucose measurement process.
Memory buttons allow access to stored results, enabling review of past readings and tracking of glucose trends; The manual clarifies how to navigate the memory functions.
These buttons, as described in the manual, are essential for controlling the meter and accessing its features, ensuring accurate and efficient blood glucose monitoring.
Test Strip Port
The Freestyle Lite instruction manual emphasizes the correct use of the test strip port. This port accepts the specific Freestyle Lite test strips, crucial for accurate glucose readings. Incorrect strip insertion can lead to errors, as detailed within the manual’s guidelines.
The manual illustrates the proper orientation for inserting the strip, ensuring a secure connection. It also highlights the importance of using only compatible test strips to maintain meter accuracy and reliability.
Properly utilizing the test strip port, as explained in the manual, is fundamental to obtaining dependable blood glucose results.
Setting Up Your Freestyle Lite Meter
The 72-page Freestyle Lite manual guides initial setup, including battery insertion and date/time configuration. Proper setup, per the manual, ensures accurate and reliable operation.
Inserting the Battery
According to the Freestyle Lite instruction manual, battery installation is the first step in setting up your meter. The manual details the type of battery required for optimal performance – typically a standard 3V coin cell battery.
Ensure the battery compartment is clean and free of debris before insertion. The manual provides a diagram illustrating the correct polarity (+ and -) for battery placement. Incorrect insertion can prevent the meter from powering on or cause inaccurate readings.
Always handle batteries with care, avoiding contact with metal objects to prevent short circuits. Refer to the manual’s safety precautions regarding battery disposal.
Setting the Date and Time
The Freestyle Lite instruction manual emphasizes the importance of accurate date and time settings for proper data tracking. This allows for precise record-keeping of your blood glucose readings, crucial for identifying trends and sharing information with your healthcare provider.
The manual guides users through a step-by-step process, utilizing the meter’s buttons to navigate the date and time menus. It details how to adjust the year, month, day, hour, and minute.
Confirm each setting carefully before saving, as incorrect date/time impacts data accuracy.
Adjusting Meter Settings
The Freestyle Lite instruction manual details customizable settings to personalize your testing experience. These adjustments cater to individual needs and preferences, enhancing usability and data interpretation. Users can modify settings like glucose units (mg/dL or mmol/L) to align with their healthcare provider’s recommendations.
The manual explains how to access and modify these settings using the meter’s buttons. It also covers options for setting audible beeps and adjusting display brightness for optimal visibility.
Carefully review each setting before saving.
Performing a Blood Glucose Test
The Freestyle Lite manual guides users through testing. It details preparing the lancing device, applying blood to a test strip, and accurately reading glucose results.
Preparing the Lancing Device
According to the Freestyle Lite instruction manual, proper lancing device preparation is crucial for a comfortable and accurate test. First, ensure the device is clean and assembled correctly. Select an appropriate lancet depth setting based on your skin type – lower settings for thinner skin, higher for thicker.
Insert a fresh, sterile lancet firmly into the lancing device, following the manual’s illustrations. Cock the device, preparing it to pierce the skin. Always use a new lancet for each test to prevent infection and ensure optimal sharpness. Proper preparation minimizes discomfort and maximizes blood sample collection efficiency.
Applying Blood to the Test Strip
The Freestyle Lite instruction manual emphasizes correct blood application for accurate results. Once a sufficient drop of blood is obtained from the lancing site, gently touch the edge of the test strip to the blood droplet. Do not smear or wipe the blood onto the strip; allow it to be drawn in automatically by capillary action.
Ensure the sample fills the designated area on the test strip completely. Insufficient blood can lead to inaccurate readings or error messages. Avoid applying blood from areas with alcohol or cleaning solutions, as this may interfere with the test.
Reading Your Blood Glucose Result
The Freestyle Lite meter’s instruction manual details how results appear on the display shortly after blood application. The meter will display your blood glucose level in milligrams per deciliter (mg/dL). The reading is typically shown within seconds, though this can vary.
Pay attention to any symbols or error messages displayed alongside the numerical result. These indicators provide crucial information about the test’s validity. Refer to the manual’s troubleshooting section for explanations of specific error codes and their meanings.

Understanding Your Results
The Freestyle Lite manual guides interpreting readings, identifying high or low glucose levels, and understanding factors influencing results for effective diabetes management.
Target Blood Glucose Ranges
Understanding your target ranges is crucial when using the Freestyle Lite meter. While individual goals vary based on age and health, general guidelines exist. Typically, before meals, a target range of 80-130 mg/dL is recommended.
Two hours after starting a meal, aim for less than 180 mg/dL. The Freestyle Lite instruction manual emphasizes consulting your healthcare provider to establish personalized target ranges.
These ranges are vital for effective diabetes management, helping to prevent both immediate discomfort and long-term complications. Consistent monitoring with the Freestyle Lite aids in achieving these goals.
High and Low Blood Glucose Readings
The Freestyle Lite meter helps identify concerning glucose levels. Readings consistently above 200 mg/dL are considered high and may indicate a need to adjust medication or diet, as detailed in the manual. Conversely, readings below 70 mg/dL signify low blood sugar (hypoglycemia).
Hypoglycemia requires immediate attention – consume fast-acting carbohydrates.
The Freestyle Lite instruction manual stresses promptly addressing both high and low readings, and consulting a healthcare professional for guidance on managing these fluctuations for optimal health.
Factors Affecting Blood Glucose Levels
The Freestyle Lite manual acknowledges numerous factors influencing readings. Diet plays a crucial role; carbohydrate intake directly impacts glucose levels. Physical activity increases insulin sensitivity, potentially lowering blood sugar. Stress and illness can elevate glucose, requiring careful monitoring.
Medication, including insulin and oral diabetes drugs, significantly affects readings.
Hydration levels and even time of day can contribute to variations. The manual emphasizes consistent monitoring and understanding these influences for effective diabetes management.
Meter Memory and Data Management
The Freestyle Lite meter stores test results, allowing calculation of averages for informed tracking. Data download capabilities to a computer are mentioned, if applicable, for detailed analysis.
Accessing Test Results Memory
The Freestyle Lite meter diligently stores your blood glucose test results, providing a valuable historical record for managing your diabetes. This internal memory allows you to review past readings, helping identify trends and patterns in your glucose levels over time.
To access this stored data, typically you’ll navigate through the meter’s menu using the buttons. The instruction manual details the specific steps, but generally involves scrolling through previous test dates and times.
This feature empowers you to proactively understand how diet, exercise, and medication impact your glucose control, fostering better self-management and informed discussions with your healthcare provider.
Calculating Average Results
Beyond simply storing readings, the Freestyle Lite meter offers the convenience of calculating average blood glucose results. This feature provides a broader perspective on your glucose control than individual readings alone. The meter automatically computes averages, typically over 7, 14, or 30-day periods.
Consult your Freestyle Lite instruction manual for precise button sequences to access these average values. Understanding these averages helps you and your healthcare provider assess the effectiveness of your current treatment plan.
Regularly reviewing these calculated averages is a proactive step towards optimized diabetes management.
Downloading Data to a Computer (if applicable)
Information regarding direct data download capabilities for the Freestyle Lite meter appears limited based on available documentation. Unlike some modern glucose meters, the standard Freestyle Lite model doesn’t explicitly advertise Bluetooth or USB connectivity for direct computer transfer.
However, some older documentation references software compatibility. Check the included manual or Abbott’s website for potential software options, though availability may be limited.
Manual logging of results remains a viable alternative for tracking and sharing data with your healthcare provider.
Troubleshooting Common Issues
The Freestyle Lite manual addresses error messages, meter failures, and inaccurate readings. Consult the guide for solutions to these problems and ensure proper operation.
Error Messages and Their Meanings
The Freestyle Lite meter utilizes various error messages to communicate potential issues during operation. Understanding these codes, as detailed in the comprehensive 72-page instruction manual, is crucial for effective troubleshooting. Common errors might indicate issues with the test strip, insufficient blood sample, or internal meter malfunctions.
The manual provides a complete list, explaining each message and offering step-by-step guidance on resolving the problem. Ignoring error messages can lead to inaccurate results, so always refer to the manual for clarification and appropriate action. Proper interpretation ensures reliable blood glucose monitoring.
Meter Not Turning On
If your Freestyle Lite meter fails to power on, consult the 72-page instruction manual for troubleshooting steps. Initially, verify the battery is correctly installed and possesses sufficient charge. A depleted or improperly seated battery is a frequent cause.
Ensure the battery compartment is clean and free from corrosion. If the issue persists, attempt a reset as outlined in the manual. If these steps fail, contact Abbott customer support, as it may indicate an internal meter fault requiring professional attention.
Inaccurate Blood Glucose Readings
Should your Freestyle Lite meter deliver questionable results, the 72-page instruction manual advises several checks. First, confirm the test strips are within their expiration date; expired strips yield unreliable readings.
Verify proper blood sample application – insufficient or excessive blood can skew results. Ensure the meter and lancing device are clean. If inaccuracies persist, compare readings with a laboratory test. Contact Abbott support if problems continue, as it could signal a meter malfunction needing attention.

Maintaining Your Freestyle Lite Meter
The 72-page Freestyle Lite manual stresses regular cleaning. Proper storage of the meter and test strips, alongside checking expiration dates, ensures accurate and reliable performance.
Cleaning the Meter
Maintaining a clean Freestyle Lite meter is crucial for accurate results, as detailed in the comprehensive 72-page instruction manual. Regularly wipe the exterior of the meter with a slightly damp cloth. Avoid using harsh chemicals or abrasive cleaners, as these can damage the device.
Pay particular attention to the test strip port, ensuring no blood or debris accumulates. Gently remove any residue with a cotton swab lightly moistened with water. Never immerse the meter in liquid. Proper cleaning, as outlined in the manual, contributes to the longevity and reliability of your Freestyle Lite meter, ensuring consistent and trustworthy blood glucose readings.
Storing the Meter and Test Strips
Proper storage, as detailed in the 72-page Freestyle Lite instruction manual, is vital for maintaining accuracy. Store the meter in a clean, dry place, away from extreme temperatures and humidity. Avoid direct sunlight and keep it protected from dust and impact.
Test strips should also be stored in their original container, tightly closed, and in a cool, dry location. Do not refrigerate or freeze test strips. Always check the expiration date before use, as expired strips can yield inaccurate results. Following these guidelines ensures optimal performance and reliability of your Freestyle Lite system;
Test Strip Expiration Dates
The Freestyle Lite instruction manual (72 pages) emphasizes the critical importance of checking test strip expiration dates. Using expired strips can lead to inaccurate blood glucose readings, potentially impacting treatment decisions. Locate the expiration date printed on the test strip vial – it’s typically month/year.
Never use strips past this date. Discard any expired strips properly. Consistent use of unexpired strips, stored correctly, ensures the reliability and accuracy of your Freestyle Lite meter, contributing to effective diabetes management.

Safety Precautions
The Freestyle Lite manual stresses safe disposal of lancets and strips, preventing infection. Contact your healthcare provider if issues arise during testing or interpretation.
Proper Disposal of Used Lancets and Test Strips
Ensuring safe disposal of used lancets and test strips is crucial when using the Freestyle Lite meter. These items are considered biohazardous waste due to potential blood contamination. Always place used lancets in an approved sharps container – a puncture-resistant container designed for safe disposal.
Do not discard lancets in regular trash bins, as this poses a risk to sanitation workers and others. Used test strips should also be disposed of responsibly, ideally in a sealed bag before placing them in the trash. Refer to your local regulations for specific guidelines regarding biohazardous waste disposal in your area.
Avoiding Infection
Maintaining strict hygiene is paramount when using the Freestyle Lite meter to prevent infection. Always wash your hands thoroughly with soap and warm water before and after performing a blood glucose test. Never share your lancing device or test strips with others, as this can transmit bloodborne pathogens.
Clean the meter regularly as outlined in the manual. Use an alcohol swab to disinfect the finger-prick site before lancing. Properly dispose of used lancets in a sharps container to avoid accidental needle sticks. If you notice any signs of infection, such as redness, swelling, or pus, consult your healthcare provider immediately.
When to Contact Your Healthcare Provider
Promptly contact your healthcare provider if you experience consistently inaccurate readings with your Freestyle Lite meter, despite following the instruction manual’s troubleshooting steps. Seek medical advice for frequent or unexplained high or low blood glucose levels, even if within target ranges.
Report any signs of infection at the finger-prick site, or if you are unsure about interpreting your results. Discuss any changes in your medication, diet, or exercise routine with your doctor, as these can impact glucose levels. Regular check-ups are crucial for effective diabetes management.
Frequently Asked Questions (FAQ)
The 72-page Freestyle Lite instruction manual doesn’t explicitly detail these FAQs. However, users often inquire about strip compatibility, calibration frequency, and warranty details.
Can I use test strips from other brands?
It is strongly discouraged to use test strips not specifically designed for the Freestyle Lite meter. The meter’s accuracy is calibrated and validated solely with Abbott Freestyle Lite test strips. Employing strips from alternative brands can lead to significantly inaccurate blood glucose readings, potentially jeopardizing your health management decisions.
The Freestyle Lite system relies on a specific electrochemical reaction between the test strip and the blood sample. Different brands utilize varying chemistries and strip designs, which the meter is not equipped to interpret correctly. Always refer to the comprehensive 72-page instruction manual for approved accessories.
How often should I calibrate my meter?
The Freestyle Lite meter generally does not require routine calibration, unlike some older glucose monitoring systems. It’s designed for factory calibration and utilizes AutoCode™ technology to automatically adjust to each new batch of test strips. However, if you suspect inaccurate readings, or if you’re experiencing inconsistent results, consult the 72-page instruction manual.
Calibration might be necessary if the meter has been exposed to extreme temperatures or humidity. Always prioritize using genuine Freestyle Lite test strips to maintain accuracy and avoid the need for manual calibration procedures as detailed in the manual.
What is the warranty on the Freestyle Lite meter?
Information regarding the specific warranty details for the Freestyle Lite meter isn’t directly provided in the snippets available. However, a comprehensive 72-page instruction manual likely contains this crucial information. Typically, glucose meters come with a limited warranty covering defects in materials and workmanship.
Users should carefully review the warranty terms outlined in the manual to understand the duration of coverage, what is covered, and the process for submitting a warranty claim. Retain your proof of purchase for warranty validation.